

Opening the File:

I firstly found my chosen image in bridge, where I right clicked the image and selected 'Open With' and then 'Adobe Photoshop'. This opened the image in Camera Raw and photoshop.
Colour Correction:

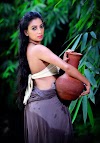
By selecting the 'White Balance Tool', the colour of the image can be corrected by selecting something that is supposed to be white in the image - for example, for this image, I selected the model's top
('White Balance Tool' is highlighted, in the left hand corner).

(Image after white balance tool is applied)
Adjusting Light in the Image:

By adjusting the bars on the right of the screen, the 'exposure' of the image can be increased or decreased depending on whether you want your picture to look brighter or darker. If your image was a JPEG for example, this would not work in the same way and would stop you from being able to see the image properly, which is why it's important to take photographs in Camera Raw to have more free reign over adjusting their appearance.

Here I have slightly adjusted the contrast of the image to make the image clearer - the light areas more bright and the dark areas even darker. I have not adjusted the temperature or saturation of the image as I am satisfied with the outcome from using the White Balance Tool.
Creating a Monochrome Image:

When using Camera Raw, creating a monochrome image is very easy: HSL/Grayscale > Tick 'Convert to Grayscale'.

Effects can be added to an image such as 'Post Crop Vignetting' under the 'FX' tab. This creates a hue around the edges of the image. By moving the bar down, you get the dark effect shown above, which is a more modern appearance. If you move it up, you get a white effect, similar to what you see in Victorian images which may be useful for vintage shoots.
(In the image above I have over dramatised the effect for it to look obvious in the screenshot).
Retouching:

As the brief requires only very light retouching of the images, I have chosen to only use the 'Spot Healing Brush Tool' as this provides adequate results for what is needed. In the image above, there are only a few imperfections, mostly in the forehead area:

I have adjusted the size of the tool according to the size of the imperfection that I am removing:

Once adjusted, I have selected over the area(s) to effectively and easily remove it.
Before and After


The result of this image is for example purposes.
All images on this post are my own.


0 Yorumlar